Locations
Star systems follow a consistent naming scheme. If you're in a system called BOOP, then BOOP refers to the star itself. BOOP-1 is the first planet outwards, BOOP-2 the second, and so on.
Galactic coordinates
Every star has a set of fixed 3D coordinates in the galaxy, as an (x, y, z) offset from Sol in light years. Sol is the origin (0, 0, 0). Interstellar distances are computed directly from these coordinates and are used in calculating surge travel time. Our known galactic region is roughly a 50ly radius from Sol.
New stars outside the known region can be discovered using a galactic observatory, which adds to the permanent galaxy catalogue.
System naming
There are thousands of systems in our region of the galaxy. We launched from Earth in a hurry; we forgot to pack a galactic map. The early replicants just made a catalogue of random names. If you find yourself liking a system, feel free to print a system hub and change the name to something else. The change will be permanent.
Planets and moons
Planets are numbered outwards from the star: BOOP-1, BOOP-2, BOOP-3. Moons follow the same convention, suffixed to their parent: BOOP-1-1 is the first moon of the first planet. Some planets have lots of moons - Jupiter has over 100! You'll need to run a lot of scans to fully identify them all. There are awards for completing a full system scan.
Asteroid belts
Belts sit between the planets. BOOP-BELT-1 is the first belt outward from the star. Belts are where most of your mining will take place. They are not infinite - see Resources for the depletion model.
Resource sites and salvage
Multiple resource sites and salvage items may exist at any valid location type. Resource sites have designations like BOOP-BELT-1-SITE-2 to refer to the second resource site at the asteroid belt. Salvage is given a designation like BOOP-1-3-SAL-1 to refer to the first salvage on the third moon of the first planet. The sites themselves are not valid destinations for travel, but they can be used as targets for mining operations.
System objects
Other persistent location in a system are known as system objects. These can include larger asteroids on a collision course, or megastructures. Late game features include player-created locations for various operations. These always show up in system scans and are numbered in order of discovery, eg: BOOP-OBJ-1.
Lagrange points
Each planet has five Lagrange points that you can travel to, for example BOOP-4-L3. These are gravitationally stable (or semi-stable) positions along the orbit of a planet.
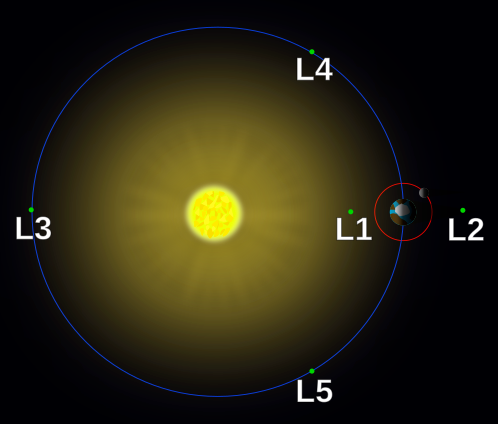
- L1 - between the planet and the star.
- L2 - far side of the planet, in the shade.
- L3 - opposite side of the orbit.
- L4 - 60° ahead on the orbit. Stable.
- L5 - 60° behind on the orbit. Stable.
L4 and L5 are the stable ones where certain devices need to be placed if they require gravitational stability - like System Hubs. By convention, we prefer the L5 point behind the planet's orbit for the most stable location with the best view.
The outer system
Younger stars carry a Kuiper belt at BOOP-KUIPER and an Oort cloud at BOOP-OORT. All of these locations are valid destinations for cruise or surge travel. If your device doesn't have a surge drive, be cautious of travelling to the outer system directly. While the planets might be within 10 AU of the star, and the Kuiper could be be 20 AU out, the Oort cloud is way out there - up to 2000 AU from the star.